

.gif)


10 Tips for Photographing Babies
I’ve previously written about the topic of photographing babies and children from the perspective of someone who has had his services engaged to photograph other people’s babies – but the last month has presented me with a different opportunity – to becoming a digital camera wielding parent – a very different scenario.
Instead of being invited into a home for one hour to do a photo shoot I’m presented with a never ending variety of opportunities to photograph our baby.
Let me share 10 ‘lessons’ and ‘tips’ that I’m learning:
1. Documentary vs Portrait
While I had visions of taking lots of ‘cute’ shots of Xavier in his first week I found that what actually happened was that the first week of his life ended up being more like a documentary shoot. The focus of my shots ended up being of a lot of ‘firsts’. First moment with Mum, first bath, first time on the scales (he was just under 9 pounds), first outfit, first manicure (he had long nails from day one), first time meeting grandparents etc. I ended up taking a picture of him with every visitor that came (these will make nice gifts) and decided to leave the ‘cute’ shots until when we got back home and he’d settled a little more.
Get More Free Tips Like This via Our Weekly Email Newsletter
I did get a few more ‘portrait’ like shots in that first week but then ended up being more activity based ones, often with other family members. On returning home and over the three weeks since I’ve continued to take the documentary style shots but have seen a move to take a lot more portrait style shots also. Quite a few of our friends have commented on the nice balance between styles.
2. Finding the Angles
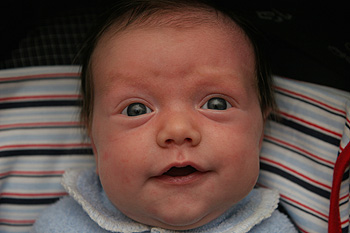
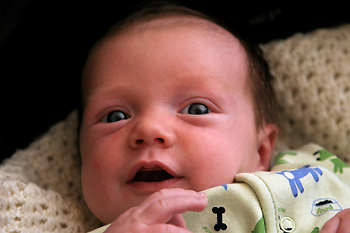
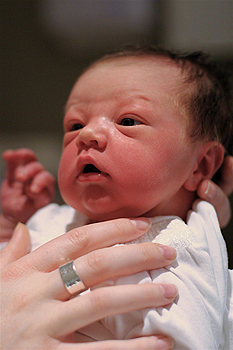
In the days following birth it is especially difficult as babies tend to be kept swaddled in bunny rugs and all you end up seeing of them for 99% of the time is a little red head. Add to that the complication of the bumps, marks, scratches and misshaped heads that newborns also tend to arrive with and finding a flattering angle that will make more than just the proud parents ooh and aah can be difficult.
Don’t give up though, all is not lost – here are a number of things that you might want to try to help with the above problems:
Get Down Low – one key to many natural baby shots is to get down on their level. I’ve spent quite a bit of time over the last week or two lying on the floor next to Xavier. It’s something I think we both enjoy anyway but it’s also a great place to use your camera. Getting down low and getting in close (see below) does present some challenges in terms of focal length (I’m using a 24-105 zoom – usually at the widest focal length) but it means you end up with shots that feel like you’ve entered the babies world rather than you’re looking down on it from above.
Close Ups – another way to improve the angles and make your shots seem more intimate is to get in close by either physically moving in or by using a longer focal length. I’d suggest a longer focal length for the really close shots is better than getting too close as shoving a big lens in your baby’s face could freak them out a little.
Nursed Shots – some of the bests shots I’ve taken over the last month have been taken when people have been nursing Xavier. This puts him into a more upright position which makes him look a little more ‘human-like’ and opens up the angles for your photos. Try a number of positions (over the shoulder, sitting him up, laying him back in arms, lying him on his tummy etc) as each one opens up different possibilities. Also remember that your baby is not the only potential subject – parents, grandparents, siblings, friends etc all can add context to the shot and you’ll appreciate having more than just baby by themselves shots later!
3. Go Macro
We all love newborn babies because they are cute and small (if only they stayed that way). As a whole they are cute but they also are made up of many little cute body parts that present a photographer with an array of wonderful subject matter – especially if you zoom in on them.
If your camera has a macro mode or if you’re lucky enough to have a purpose built macro lens use it to isolate a single body part (like a hand, an ear, a foot, a mouth etc) and use that as the complete focus of your shot.
Doing this accentuates the detail that is often missed in the shots many of us take – and you’ll find they punctuate your full collection of photos beautifully and can even make great feature shots.
4. Identify ‘Happy Times’
Keep on the look out for those times in your baby’s life when he or she seems most settled and content. They may not smile yet but there are times in a daily routine which are better than others for photos. I find in Xavier’s day there are a couple of moments that are especially good. One is bath time (he loves it) and another is mid morning after he’s had half of a feed and when we let him have a little ‘play’ before finishing his feed off. These are times when we’re guaranteed to get wide open eyes and even a giggle or two.
5. Keep Your Camera Close
Our baby is pretty predictable in terms of his daily routine (we seem to have got him pretty settled into one already somehow) but there are moments all day long that he does something cute, disgusting, funny and worth capturing. Without the camera handy you’ll miss these moments as they are usually fleeting. We tend to leave our DSLR in our livingroom where we spend most of our time with him but also have a point and shoot in the bedroom for other shots.
6. Keep Shooting
Babies change every day, especially in the first few months, it’s exponential and quite amazing to watch. However unless you’re looking for the changes you can easily miss them so it’s it’s important to take shots regularly.
I have friends who took hundreds of shots in the first few days after their baby was born but who didn’t take any shots again until he was 6 weeks old. They realize just how much he’d changed and how much they’d failed to photograph him until they compared their early shots with the 6 week shots.
7. Befriend the Airbrush
A lot of shots that you see of babies in Flickr are quite amazing in how smooth and perfect they make them look. The reality is that many babies are not quite so ‘perfect’ (however much their parents think they are). Little scratches, sleep in the eyes, snotty noses, dried milk around the mouth, blotchy skin, birth marks and bumps etc are common for all babies.
You might like to keep a warm, wet face washer handy to wipe away some of these things but in some instances they will come out in your photos.
I don’t mind them most of the time – I think they show your baby as he or she is and there’s nothing wrong with that. However at times they can be a little distracting and for those special shots that you might like to give as gifts you might like to do a little photoshop retouching. Most post processing editing tools will have some sort of airbrush or retouching tool – learn to use it, even if it’s just to smooth over the main marks and you’ll be amazed by the results.
8. Take Out the Color
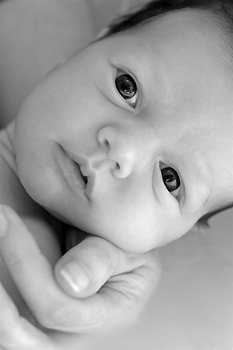
We’ve actually converted quite a few of our shots of Xavier into Black and White format. This has been useful for a number of reasons:
It’s great for dealing with the scratches, marks and blotchiness that I discussed above and significantly lessens the distractions that they bring.
It is great for ‘birth shots’ or those taken just after it. I’ve written about this before and we found that it really did work.
It softens your shots somewhat. Babies are soft, cuddly little things and taking the color out in this way accentuates this.
Similarly you might also like to experiment with de-saturating the colors in your shots to a lesser extent than going black and white. Leave a little color in your shots and you’ll end up with pastel like images that again soften the feeling of the shots and give it a very different look and feel.
9. Indirect Lighting
A challenge that I’ve faced is that it’s Winter here in Australia and that the lighting in our home is a little bleak. There have been a few brighter days than others when I’ve had some great results photographing him near windows in natural light – but in most cases I’ve needed to use a flash to some extent.
I’m no lighting expert but have found that my best results have been when I’ve used my flash in a ‘bounce flash’ way – shooting it up into a ceiling so that it’s indirect. This diffuses the light a lot which leaves Xavier less washed out in the shots, and more importantly means he’s not blinded by the light from it (we don’t want to blind our little ones by our photographic obsession – I actually asked a pediatrician about camera flashes and his advice was that it wouldn’t do damage but that for a babies comfort that indirect flash (ie bounced and/or diffused flash) would be advisable. I’m sure different doctors would advise different things but I play it safe with my bounce flash – and avoid flash altogether where possible). It also gives a fairly natural looking shot.
If you don’t have a bouncable flash try bumping up the ISO setting on your camera and increasing the aperture setting – this will mean you won’t need to use the flash at all if there is at least some natural light in the room. The other strategy would be to diffuse the flash a little by putting some tissue over the flash.
10. Pick Your Moments
There’s two things I want to say here:
Firstly timing your shots is important. Babies don’t move much but they subtly change their position and expressions in ways that can make or break a photo. I’ve had my camera set in continuous shooting mode since Xavier was born because I find that shooting a single frame often misses ‘the moment’. I’ve also ended up with some wonderful sequences of shots by shooting off three or four shots in a row.
