

.gif)


An Introduction to Catchlights
Catchlights – What are they and why are they important in Portrait Photography?
A “catchlight’ is simply the highlight of a light source reflected off the surface of the eye. This highlight adds depth and dimension to the eye, and gives the eyes life in a portrait or snapshot.
Catchlights come in all shapes and sizes, depending on the shape and size of the light source, and its distance from the subject. For example, a large, round umbrella reflector will produce a larger, more pronounced catchlight than a small portable electronic flash. Many portrait photographers use a reflector placed in the lap of the subject, or in a similar position. This usually produces a larger catchlight in the lower half of the eye (often not flattering).
In portraiture, where more than one light is used, the eyes may end up showing two or more catchlights. It’s the photographer’s job to decide which ones to save and which should be removed, using photographic software such as Photoshop.
Positioning Catchlights
The position of a catch light is determined by the placement of the “key” and “fill” lights, and changes as their height and angle away from the camera lens change. A studio portrait will show the final product with a single catchlight in each eye, typically in the 10 or 2 o’clock position, created by the main (“key”) light.
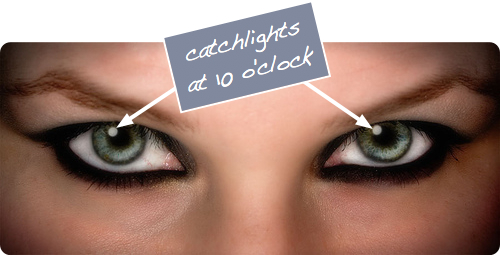
The real reason for the conventional placement of catchlights at 10 or 2 o’clock is unknown, but the earliest portrait painters found that the most pleasing balance resulted when either of those positions was used.
Consider that early artists didn’t have the luxury of multiple lights in a studio, using instead the Sun or light from a large open window. The result was a single catchlight and because the Sun illuminated the subject from a high angle, the catchlight reflected from a higher spot on the eye.
Experiment with Catchlights
I encourage you to become a student of catch lights, particularly if you have a keen interest in portrait work. Experiment with removing, then adding, catchlights to the eyes in your portraits. Use different sizes and positions, and notice the effect.
Before photographic software was developed, unwanted catchlights had to be removed by “spotting,” a labor-intensive process involving a fine camel-hair brush and an assortment of dyes. Adding a catchlight was possible, but even more difficult.
Use every opportunity to study the position and shape of catchlights in other photographers’ work, and in the eyes of your friends and coworkers. Study the paintings of old master portrait artists to learn how they used light. Your portrait work will benefit from this effort.
There is no hard-and-fast rule regarding catchlights; it’s simply a matter of personal taste and preference. You will see all manner of catch light size and placement in journals and in professional portraits. There is no “better’ or ‘worse” way to place them. In fact, the only ones who probably really notice them, are photographers!
