How to Add ICC Profiles In GIMP
Posted: February 3rd, 2020 ˑ Filled under:
GIMP Tips 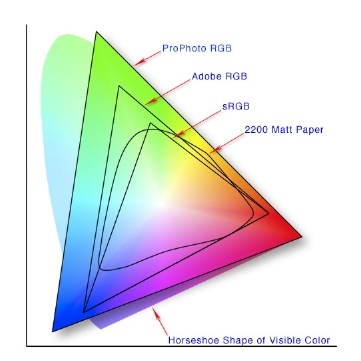
By default GIMP comes with one ICC profile preloaded and that is sRGB. While this color space works well for images you wish to view on a screen, its color gamut (range of colors) is more lacking than, say, Adobe 1998 or Pro Photo. As a simple means of diagramming this, the image at left, from the Adobe whitepaper A Color Managed Raw Workflow by Jeff Schewe and Bruce Fraser, shows how each gamut can reproduce only a certain segment of the total visible color spectrum. Using a gamut that allows for a larger color representation allows for more accurate colors when printing. And while the full range of the Pro Photo RGB gamut can’t be faithfully reproduced on most consumer monitors today, using a larger gamut does aid in more accurate color printing. It’s not necessary to use the Pro Photo RGB gamut for all your editing, Adobe 1998 RGB does a pretty good job. But that’s not the focus of this post. This article is about showing you how to use any ICC profile you’d like in GIMP and then the choice can be yours. (i.e. Please don’t start another “Gamut War!” in the comments section)
The ICC Profile for Adobe 1998 RGB, used in this example, can be found here on Adobe’s site (Windows, Mac and Linux versions). Download your appropriate file and copy the file named AdobeRGB1998.icc to a handy location on your system. For this example I created a folder on my desktop called icc to use as an example. WARNING! GIMP really doesn’t like it if you move this file after the initial load, so be happy with where you put it. While these instructions are based on use of a PC, the general steps are the same for Mac or Unix based systems.
Now then, here’s how to set GIMP to use the Adobe 1998 RGB color space:
1) Start up GIMP and click Edit, then Preferences.
2) On the Preferences screen, click on the Color Management tab on the left side.
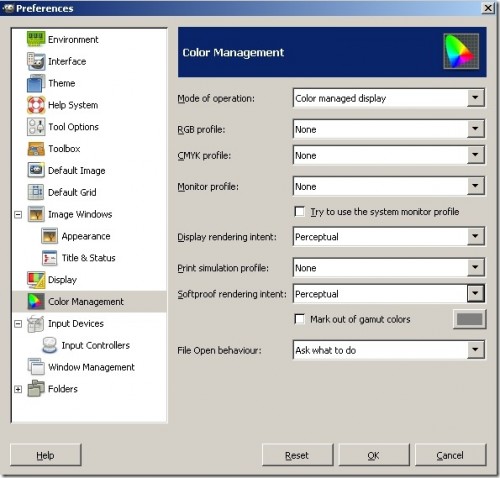
3) Click on the RBG Profile box drop down and click “Select color profile from disk….”
4) A directory tree screen will appear. Navigate to the location where you saved the file from Adobe’s site. We’re just interested in the AdobeRGB1998.icc file.
5) Select the file and click “Open”.
6) Back on the Color Management screen, you should now see your choice of “Adobe RGB (1998)” in the RGB Profile box.
And that’s all there is to it! Your workspace color will be set to Adobe 1998 RGB. Very simple and quick.


.gif)


