
.gif)


How to Create a Panorama in Lightroom
A while ago, I wrote an article explaining how to use Lightroom with external editors. Since then, I’ve been asked specifically about merging panorama images. In this article, I will show you all the steps you need to take to successfully merge a panorama and have it back in your Library with minimal fuss. I will be using Lightroom 5.2 and Photoshop CS5, but the process is virtually identical with (reasonably) older versions of both software tools. This tutorial will focus on the process of stitching a panorama image while using Adobe Photoshop Lightroom as the heart of your post-processing and image management workflow.
1) There is a Catch
We start, unusually, with a problem. As a RAW file converter and photo manager, Lightroom has limited functionality when it comes to graphical editing. In fact, all its great flexibility is concentrated within the two mentioned main functions of the software. In many other respects, Lightroom is not the best choice. For example, I can edit 98% of my wedding photographs with Lightroom alone, no problem. However, the two remaining percent happen to be Brenizer method panoramas. This is where things, at first glance, get a bit more complicated. As I am sure a lot of you already know, you can’t stitch panorama images with Lightroom alone. If you didn’t yet know this and stumbled upon this article hoping to find a different answer, I am sorry to disappoint you. It lacks such functionality at its core. There is, of course, a workaround. What Lightroom can’t do on its own, it can do with the help of external editors and plug-ins. Panorama stitching happens to be one of those holes you can fill in quite easily if you own a Lightroom-compatible panorama stitching software which, in my case, is Photoshop. So, in order to create a panorama in Lightroom (sort of), you need to export those files to an external editor. Photoshop has a very powerful Photomerge tool for just such occasions, but the problem remains. You need to own another piece of software to perform such a task. I find that perplexing.
As different Lightroom and Photoshop are, they have their similarities. My point is, Photomerge could be one of them. Why not make it a stand-alone plug-in or an integrated tool that is part of Lightroom? Granted, without user-controllable layers, Photomerge is not nearly as powerful, but I am sure Adobe could come up with a way to work it out.
I may be overemphasizing this, and if so, forgive me. While I may be right on one hand, on another – Lightroom should not be mistaken for something it is not. It was never designed to be as powerful as Photoshop for anything but image management and RAW file post-processing. With that, it has tools for slideshow and printing. So perhaps instead of seeing lack of integrated panorama stitching tool as a shortcoming, I should see its ability to seamlessly use external editors for such tasks as a strength. A half-full glass is a better choice, then. Let’s move on.
2) About the Photograph
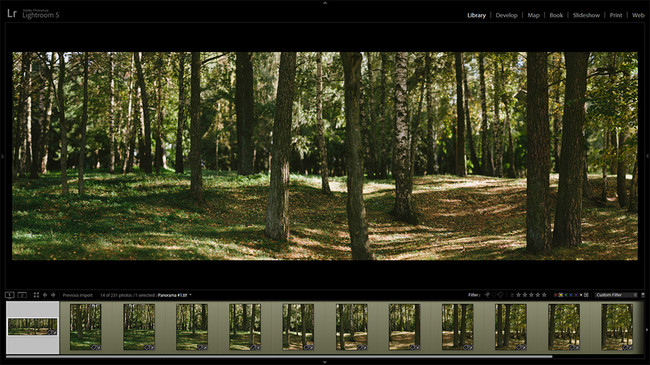
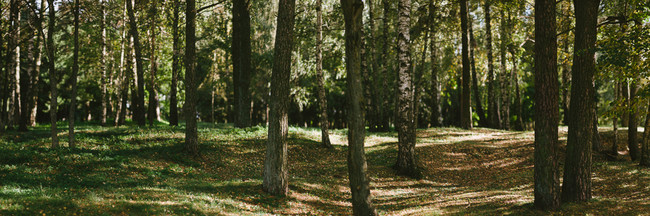
For this tutorial, I chose a very simple panorama image. The goal was to merge it with the least manual tweaking and errors possible. Thus, the panorama is made of just 10 vertical photographs and has no discernible main object of interest. Most of the image is out of focus except for a very narrow patch on the ground and one of the tree trunks. All of this makes the process of blending different images together very easy and quick. It can hardly be qualified as a Brenizer-type panorama despite having been taken with an 85mm lens at f/1.4, because of how simple it is. At the end of the article I will provide you with a few more (complex) panorama samples I merged in Photoshop through Lightroom just as successfully, but with some additional manual tweaking of layers and masks.
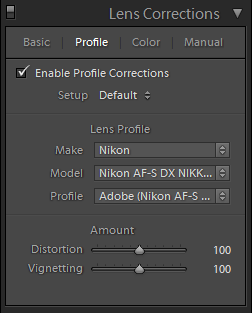
When I come back from a wedding or any other type of shoot, I import my photographs into Lightroom from CF cards directly, which means RAW image files that will be used for panorama stitching are imported with the rest of the images. I will also process these fragments just as I would any other image before merging them into a single panorama. However, there is one important step that I will always take with RAW files that are parts of a panorama, and not always with the rest of the photographs: remember to always fix lens vignetting and distortion through Lens Corrections panel in Develop Module. It is especially important with Brenizer method panoramas, which are taken at wide aperture settings that result in high vignetting.
Other than that, I try to do most of the post-processing work before merging these images into a single panorama. Once you are done stitching that panorama, chances are it is going to be of very high resolution. I frequently get portrait panoramas that are around 80 megapixels, and that is with a 12 megapixel Nikon D700 camera. Use a D800 or even D5200 in its place and merge 40-50 images and you may end up with twice that, at least. It is not easy for Lightroom to quickly handle such large images in its Catalog, especially in TIFF format which holds more data than JPEG, and especially if you tend to do panoramic photography on a regular basis. You may even consider downsizing it in Photoshop right after stitching process is complete. In any case it is best to keep non-destructive editing to a minimum on such large files. The usual settings – sharpening, noise reduction, grain, split toning and so on – are done to the RAW files prior to stitching.
That is not to say I avoid post-merge adjustments completely – no. For example, if I am unsure if I want that particular panorama in B&W or color, with grain or not, I will do minimal adjustment before the merging process and decide once I have a full-size stitched panorama in my Library. Why waste time and effort repeating the lengthy process several times if it can be avoided? Generally, though, I’m pretty sure about what sort of processing I want from the beginning. In such cases and if needed, I will add Post-Crop Vignetting with the help of Effects panel after the panorama has been imported into the Library. Even if I change my mind later, the original RAW files remain intact.
A side note: Lightroom 5 introduced an annoying import bug where, when importing images from an external storage device, thumbnail load times were excruciatingly slow in the Import dialogue. While there is a workaround, I am happy to report that Lightroom 5.2 has fixed the issue, hopefully for good.
4) Export to Photoshop
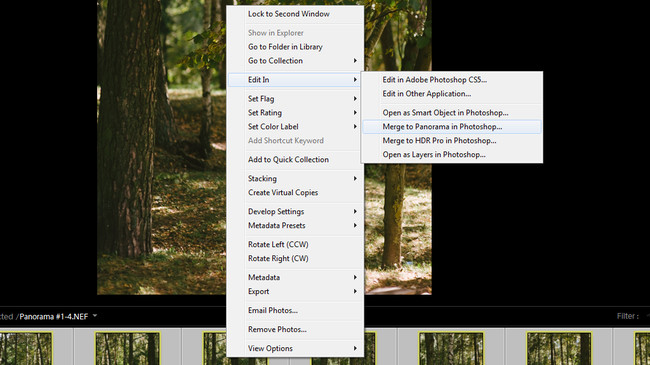
Now that your RAW files are all ready and looking good, it is time to start merging them into a single image. Lightroom has a way of exporting its images to an external editor, such as Photoshop, as either separate files or separate layers of one document. But for panorama stitching, there is a separate option called “Merge to Panorama in Photoshop…”. Before you do anything, first select all the images in your filmstrip or main window (in Library or Develop Modules). Then, right-click on any of the images and choose “Edit In” – “Merge to Panorama in Photoshop…” option, as shown in the following screenshot:
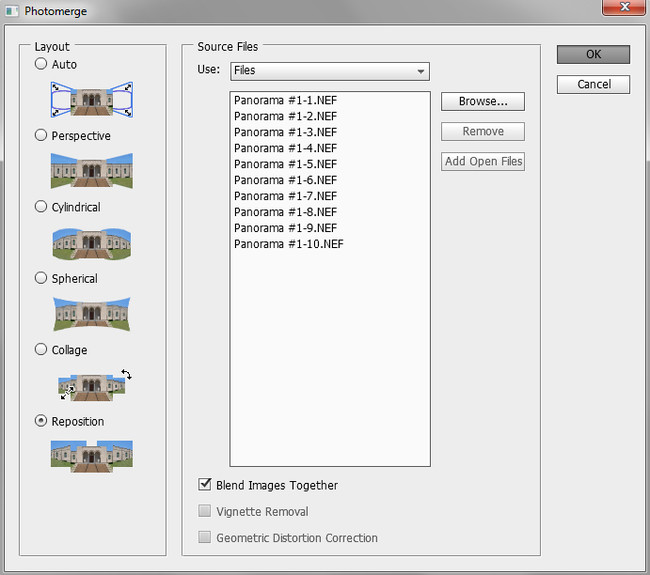
You should now see all the RAW files you selected listed in the Photomerge window. The final big step is choosing which merging layout to use on the left side of Photomerge tool. This is actually an extremely important setting and can mean all the difference between a poorly rendered panorama and a great one. All these modes will be covered in a separate article much more thoroughly. Even if you understand these modes, however, you may find that there is no one that works best all the time. I would say Auto is more often that not a safe bet, but it is also the one that will distort the image most. For our simple panorama that consists of vertical shots taken while turning the camera horizontally from left to right, Reposition will most like render the best result by far. Make sure to select the “Blend Images Together” checkbox whichever layout you choose.
A side note: before you crop, you may consider merging all the layers into one by hitting Ctrl+Shift+E (Windows). Otherwise, with all the complex layers and masks, it may take quite a bit more time for Photoshop to finish the cropping process.
As soon as your are satisfied with the result, it is time to move it back to Lightroom. Because you chose to use Photoshop as an external editor for stitching the panorama, there is no need to save and re-import the final image manually. All you have to do is close the document and, when prompted whether you want to save the changes you made in a pop-up dialogue, click “Yes”:
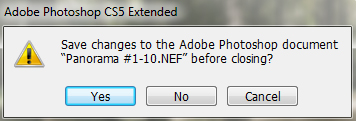
As soon as you click “Yes” in that last dialogue, you can safely close Photoshop. Your panorama image will almost immediately appear in Lightroom right next to the fragment RAW files. You can then continue with any sort of further adjustments you like. Everything you do is, as usual, non-destructive. You will notice that the image will be saved as TIFF in the source folder where your RAW files are located, so you won’t lose it.
6) Final Words
As you may have gathered by now, this article was supposed to explain how to create panorama images with Lightroom. The fact of the matter is, you can’t do it with Lightroom alone. Yes, I processed the source images in Lightroom and also have the final result in the Library without actually exporting and importing back again any of the images. So, technically, I guess you could (with some effort) say the panorama was made using Lightroom. At this point, I am sure some of you are thinking – “no, it wasn’t.” And… well, that is true. It wasn’t Lightroom that did the heavy lifting. Because the middle step, the most important one that actually created the panorama, is performed with Photoshop (or any other panorama stitching software you may own). In other words, this is cheating. Having said that, if your general post-processing workflow is built around Lightroom and you enjoy occasional panoramic photography, there is hardly an easier way to integrate the process of stitching panoramas as seamlessly as this.
If previously you found Lightroom and panoramic photography incompatible, I hope this article has helped you find a way to enjoy both.
7) Additional Samples
The panorama that I worked on in this article was very simple and, actually, the easiest I’ve ever done. Here are some more image samples that I created the exact same way. You will notice they are a lot more complex, however, and took both more time and more tries to get right. More importantly, though, stitching these panorama images also required some manual merging so as to avoid errors. If you frequently get errors while merging panorama images with Photoshop (either through Lightroom or not), our “How to Fix Panorama Merging Errors” might just be what you need.