
.gif)


.jpg)
How to Properly Resize Images in Lightroom
If you like sharing your photographs online, whether on Facebook or on your own blog, you should learn how to properly resize your images. While your camera can take very high resolution photographs, it is always a good idea to down-size or “down-sample” those images, not only because most websites won’t accept large images, but also because making those images smaller will actually make them look better, if done correctly. In this quick tutorial, I will show you the proper way to resize images in Lightroom. A separate article on how to do this in Photoshop can be found in my “how to properly resize images in Photoshop” article. I use the below method when exporting images out of Lightroom. You can employ this technique to any photograph – whether it is a portrait or a sweeping landscape.
1) Why Resize / Down-Sample Images?
Why would you want to resize an image? Your camera is a very advanced tool and it contains millions of pixels. This is good if you want to print your images, but what if you want to share those photographs online? Many websites won’t even let you upload high resolution images, while others like Facebook will down-size them for you, automatically lowering the resolution and quality of those photographs. Because this automated photo reduction process is often not optimized for best quality, it can make your resized photo appear soft and might even result in loss of colors. To prevent that, it is always a good idea to properly resize your images before you use them online. This way, you are in full control of how your photo should look.
2) The image resizing workflow
Lightroom greatly simplifies the image down-sampling / resizing process. Here is my simplified workflow process:
Import images into Lightroom
Make necessary adjustments to the image I want to resize
Make additional adjustments in Photoshop that cannot be done in Lightroom (if necessary)
Export the image in sRGB color profile with specific settings
I use the above process most of the time and resort to my much more complicated Photoshop resizing process only when working on select images that I want to showcase.
3) The image resizing process
Select an image or multiple images you want to export out of Lightroom, then either go to File->Export or press CTRL+SHIFT+E on your keyboard. The export window will come up that looks like this:
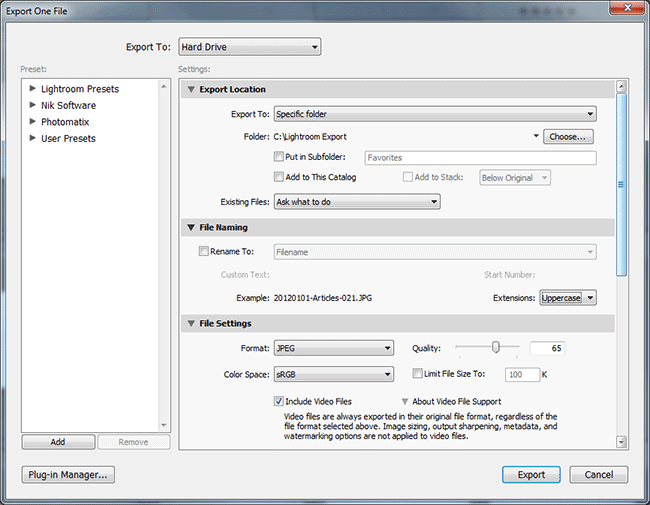
Start out from “Export Location” and start out by choosing “Specific folder” from the drop-down. Next, click the “Choose” button and select a folder on your computer where you want the exported files to go. I set mine to “Lightroom Export” but you can choose whatever you want. Some people export to their Desktop and then check “Put in Subfolder” and type a different name every time they export. Whatever works for you. For “Existing Files”, I have set mine to “Ask what to do”, so that the system asks me what to do if a file is already present in my export folder.
Under “File Naming”, if you check “Rename To”, your files will be renamed to something different. I usually check this box and select “Custom Name”, then under “Custom Text” I type the name of the photoshoot. For example, if I type “Lisa and Bob Weddding”, then the first file will be called “Lisa and Bob Wedding” and the next files will start with the same name, with a dash and a number added at the end of the file. So it is safe to do this for multiple files as well. “Extension” does not matter – I set mine to “Uppercase”.
The next section is very important. This is where you manage the file quality and set some important parameters:
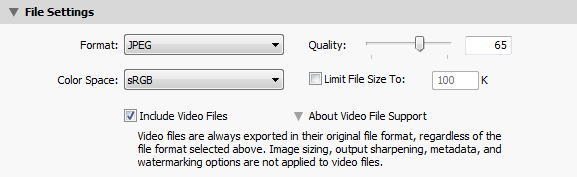
Next, set “Color Space” to sRGB – that’s what most monitors on the Internet are able to see properly. Don’t check “Limit File Size To” and you can keep “Include Video Files” checked – it has no effect on images anyway.
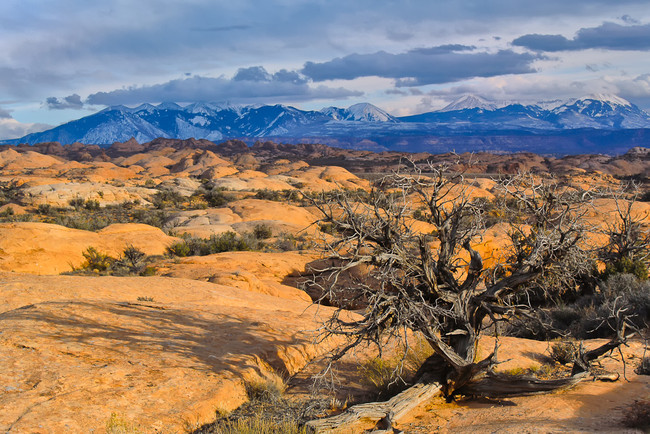
Under “Image Sizing”, make sure to check “Resize to Fit” – this is what will actually resize the image to a smaller version for the web. I usually set mine to “Long Edge”, which limits the width or height of the image (depending on whether it is horizontal or vertical) to a certain value. That value you set right under, in the first input field. I typically use “1024″ pixels, which is a good size for the web, but it is up to you if you want to go smaller or slightly larger. Don’t use a high number here, because it will result in a huge file; plus, most websites won’t allow you to upload huge images anyway. For reference, the first image in this article is 1024 pixels wide when you click and open it in full size.
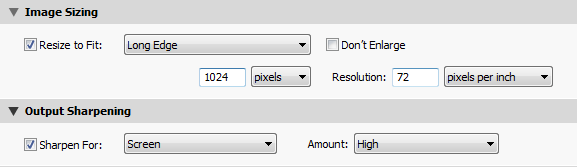
The next section is very important. This is where you set the amount of additional sharpening Lightroom should apply to images after they are exported. What you pick in this section really depends on how much sharpening you have already applied to the photograph in Lightroom. If you have no idea what sharpening values to set in Lightroom, see my detailed article on “how to sharpen photographs in Lightroom. I have my Lightroom’s default sharpening set to “Amount: 50, Radius: 1.0, Detail: 50″. With those values, I always set my “Output Sharpening” to “Screen” and I choose “High” for Amount. A “High” value works great for me, because it adds just enough sharpening for my taste. If I perform a much more aggressive sharpening in Lightroom, I choose “Standard” instead, because “High” might be too much.
The last three sections are called “Metadata”, “Watermarking” and “Post-Processing”:
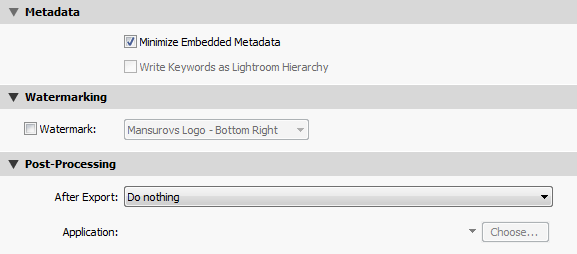
If you have a watermark you want to use, pick the right one under “Watermarking”. If you want to find out how to add a watermark in Lightroom, see my “how to watermark a photo in Lightroom” article.
Lastly, leave “Do nothing” under “Post-Processing”->”After Export”.
Once you are done, just click the “Export” button on the very bottom of the window and the image(s) will start exporting.
That’s it! The good news is, once you set the settings in this window, Lightroom will always remember them, so you can reuse the settings without having to modify them each time.
