
.gif)


.jpg)
How to Properly Resize Images in Photoshop
If you like sharing your photographs online, whether on Facebook or on your own blog, you should learn how to properly resize your images. While your camera can take very high resolution photographs, it is always a good idea to down-size or “down-sample” those images, not only because most websites won’t accept large images, but also because making those images smaller will actually make them look better, if done correctly. In this quick tutorial, I will show you the proper way to resize images in Photoshop. I have seen people employ all kinds of different techniques when it comes to resizing images in Photoshop. The below method is how I personally do it and it has been working great for me, at least based on your feedback. You can employ this technique to any photograph – whether it is a portrait or a sweeping landscape.

1) Why Resize / Down-Sample Images?
Why would you want to resize an image? Your camera is a very advanced tool and it contains millions of pixels. This is good if you want to print your images, but what if you want to share those photographs online? Many websites won’t even let you upload high resolution images, while others like Facebook will down-size them for you, automatically lowering the resolution and quality of those photographs. Because this automated photo reduction process is often not optimized for best quality, it can make your resized photo appear soft and might even result in loss of colors. To prevent that, it is always a good idea to properly resize your images before you use them online. This way, you are in full control of how your photo should look.
2) The image resizing workflow
Once again, there are many different ways to down-sample images. Here is the workflow I personally use for my Photographs:
Import images into Lightroom
Make necessary adjustments to the image I want to resize
Open the image in Photoshop
Clean up the image (sensor dust specks, unwanted objects, etc) using spot healing and other tools
Do additional image adjustments like contrast boost, dodge and burn, levels and curves, etc
Run a single pass of noise reduction (only applies if there is visible noise at 100%)
Run a single pass of sharpening at 50-75% (Unsharp Mask) – this step is only needed if you will be using the high resolution image for print
Down-sample the image to target resolution (target resolution is typically 1024 pixels wide for horizontals and 500 pixels wide for verticals)
Run another pass of sharpening at 25-50% (Unsharp Mask)
Export the image in sRGB color profile
The process might seem complex, but it is actually not. I do not do this with every image – only the images I want to showcase (like when publishing wallpapers, etc). Everything else gets processed very simply, by just exporting directly from Lightroom.
3) The image resizing process
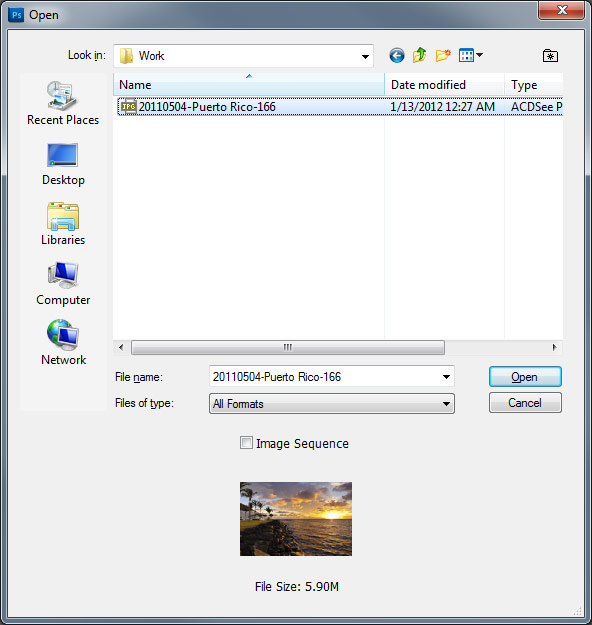
First, let’s open our photograph in Photoshop by going to File->Open and selecting the photograph we want to edit:
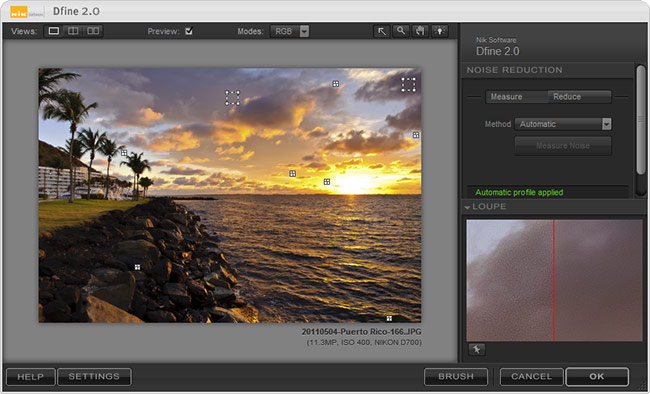
Once the full resolution image is edited, run a single pass of noise reduction. I prefer a selective noise reduction process that only cleans up noise in problem areas. If you do not know how to properly reduce noise, see my Noise Reduction Tutorial. I prefer to use commercial tools like Nik Software Dfine for selective noise reduction, because they do it much cleaner and give the best results. If you do not have a commercial tool for this, use Lightroom’s built-in noise reduction tool, I find it to work better than Photoshop’s “Reduce Noise” filter. Here is a screenshot of Nik Software Dfine reducing noise:
This step is only needed if you plan to keep the original image in full resolution for print. There is no practical reason to sharpen an image before you down-scale it (big thanks to Mark for correcting me). If your purpose is only to publish an image to the web, then skip this step completely.
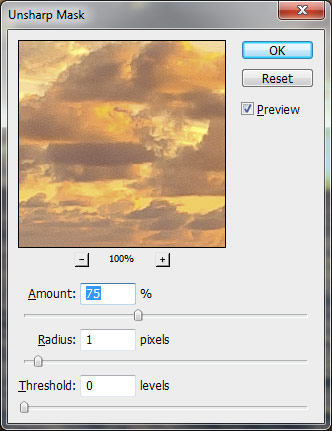
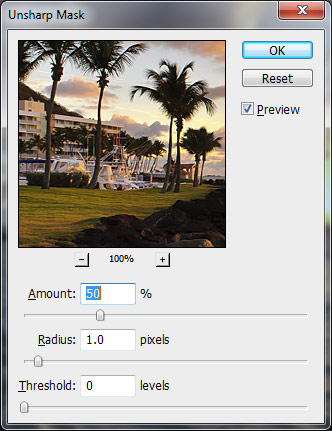
Make sure to apply a good sharpening technique to your high-resolution image. While commercial tools are great for this step, Photoshop’s built-in filters like “Unsharp Mask” and “Smart Sharpen” work great too. Here I am using 75% sharpening with 1 pixel radius:
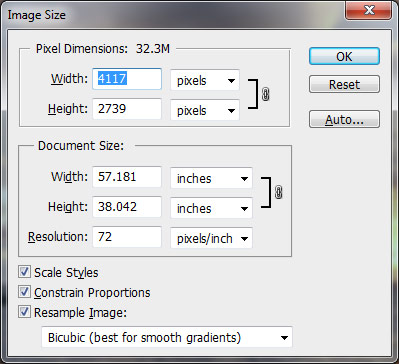
Now we are at a very important step – we will be down-sampling the image to lower the image resolution. To accomplish this, go to Image->Image Size and you will be presented with the following dialog:

Now the image is much smaller in size. Noise should be completely gone as well (assuming it was not too noisy to start with), thanks to the Bicubic down-sampling method that we have used in the previous step. Now it is time to sharpen the image a little more, which will be the final step of the process before we extract it. Once again, either use a good selective sharpening process, or Photoshop’s “Unsharp Mask” as I have:
The final step is to extract the image for the web. Do not simply use the “Save” function – it will create a huge file that is not appropriate for the web. Instead, go to File->Save for Web & Devices. A screen will come up, as shown below:
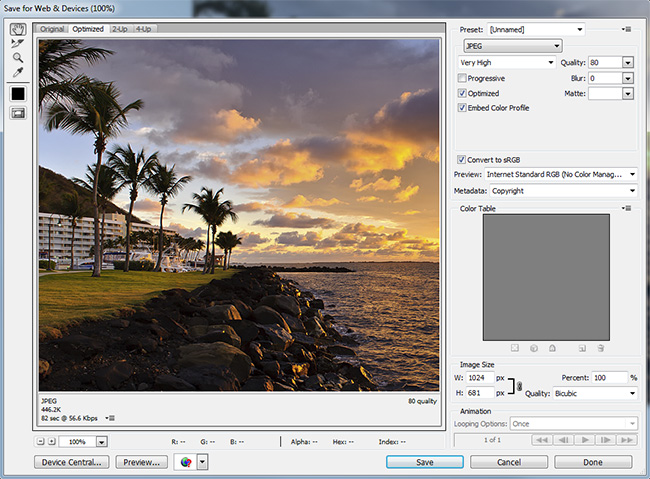
I have been asked a lot about the PPI (pixels per inch) setting that I use on my web photos. Whether you use Lightroom, Photoshop or any other image processing software, the value you use for PPI does not matter. You can leave it at whatever value (I believe 72 is default) and you don’t need to change anything. The PPI value is only important for print – changing it while exporting images for the web will only add metadata to the file and will have no impact on how it is actually displayed on a monitor.
That’s it! Here is my final image processed with the above steps: