

.gif)


.jpg)
How to Watermark a Photo in Lightroom 3
In this article, I will show you how to watermark a photo in Lightroom 3 using the standard, available tools. Adding copyright watermarks to photographs in Photoshop can be a very time consuming task. Although you can create a batch job for watermarking multiple images in Photoshop, it is a rather slow and cumbersome process that involves recording actions for different layouts. Embedding watermarks in Lightroom 2 was also painful, because you had to use a separate plugin that had to be installed and configured. Gladly, Lightroom 3 now has an integrated functionality to embed watermarks that you can use in batch action while exporting your images. Let’s go over the new method of embedding watermarks and how you can use Lightroom 3 to watermark all of your vertical or horizontal images during the file export process.

The first question you might ask yourself is – should you or should you not watermark your images? There are many opinions on this matter. Some photographers argue that watermarks prevent theft (which I and many others disagree with), allow self-promotion and help build brand recognition, while others argue that adding watermarks spoils the viewing experience and does more harm than good. Let me quickly point out what I think about watermarks and when they should and should not be used.
Unless your watermark visibly takes up the entire photo like in the image below, it can often be easily removed in Photoshop using standard tools. So if you are worried about theft and copyright infringement too much, either do not post your images online or post them in a small size with a gigantic watermark all over it. You will fend off all potential thieves for sure. I immediately close sites that show icon-sized images with huge watermarks. And I know that I am not the only one out there…

Well-known photographers rarely put copyright information on their photographs, because they want to deliver the best (and unobtrusive) viewing experience. They also often post large images that occupy the whole screen. Why aren’t they worried about copyright? Because they are known and their images are recognized. If such photographs or “works of art” are stolen or reproduced elsewhere, the offenders would most likely be reported and caught quickly. Am I saying that unless you are a well-known photographer you should be adding watermarks to your photos? Of course not. I believe you should stop worrying about theft and focus more on creating better photographs.
If watermarks are used properly, they can help promote your work instead of doing harm. You are not a stock photo agency, so stay away from large watermarks that span across your photos.
And for all those right-click disabling folks out there – you are only spoiling the browsing experience of your visitors. I hate not being able to right-click and open links/images in new pages on websites and blogs. It is about time for you to understand, that if someone really needs to steal your image, they can just press the “Print Screen” button on their keyboards, then paste the screenshot in Photoshop and crop it to their liking. The same goes to all photographers that waste their quality time converting their JPEG images to Adobe Flash, just because they foolishly think their photographs will stay safer that way. Oh and what are you going to do with them iPhone/iPad users that can’t see your work?
Before I move on to specific instructions, I would like to provide some watermarking tips and best practices:
Try to use a graphic logo instead of plain text for watermarks. If you do not have a logo yet, use short text with your name and Copyright © symbol.
When using text watermarks, try not to add the word “photography” at the end of your name. If your name is not unique (just search Google), then either come up with a nickname or use your URL (below).
If you have a short URL, you can post your website address instead of your name.
When using text watermarks, use a standard and recognizable font rather than some gothic/italic/handwriting font that is hard to read.
Do not use multiple lines of text for watermarks.
Semi-transparent watermarks always look better and more professional than bold copyright imprints. If you decide to use a watermark, make it 50% or less transparent.
Another good watermarking method is to add some space underneath each photo and then put your copyright information there. But you would have to use Photoshop and record actions in order to do that.
Put your logo/text watermark in the corners of your photos. Top-left, top-right, bottom-left and bottom-right locations typically work the best.
If you do not feel like sharing your camera settings, remove your EXIF data from images, but only keep your copyright and contact information. This would just be additional copyright protection for you in case your image is posted elsewhere.
2) The Watermark Position Dilemma
Because of the nature of photographs and their colors and patterns, finding a good placement for your watermark can be a problem. Where should it be placed and how? As I have pointed out above, the best locations for standard watermarks are near the top and bottom corners of your photos (unless you chose to add extra space to the bottom or the side of your photographs in Photoshop or other third party software). So which corner should you use for watermarks? I would say all of them! Why? Because every photo will be different and while one corner might work for one photo, that same corner might not for another. A gray watermark will not be visible on a photo with a grey corner where the watermark is placed. So you have two options – either to use a different shade of color that is visible in the same corner, or move the watermark to a different location. I prefer the latter for consistency, but it is totally your choice.
Now moving your watermark in photos would be extremely inefficient if you had to change your watermark every time you need to move it. That’s why the best method is to create multiple watermarks in Lightroom 3 and put them in multiple locations. For example, I have 4 different Lightroom watermarks that I called “Top-Left Mansurovs Logo”, “Top-Right Mansurovs Logo”, “Bottom-Left Mansurovs Logo” and “Bottom-Right Mansurovs Logo”. All watermarks are the same (our graphic logo) – they are just positioned differently.
3) Creating a text watermark in Lightroom 3
Let’s go through the process of creating a text watermark in Lightroom 3. To access the watermark function in Lightroom, you can go to “Edit->Edit Watermarks…” (Lightroom->Edit Watermarks on Macs) or you can also access it from Lightroom’s Export window. I normally access it via the export window, which can be found in File->Export or pressing CTRL+SHIFT+E:

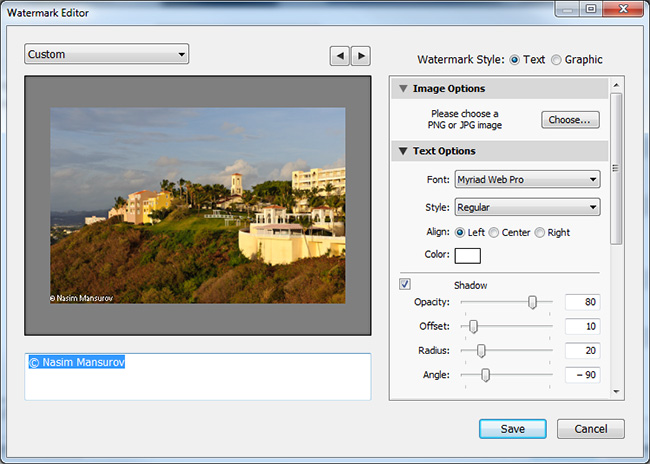

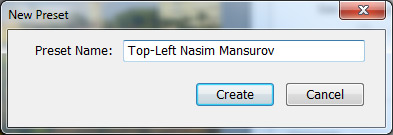
The next task is to pick an “Anchor” point, meaning where your copyright will be located. As I have pointed out above, it is best to keep it in the top left/right and bottom left/right corners. Start with the top-left corner. Remember, our objective is to create 4 watermarks with different locations. Next, click “Save” and the “New Preset” window will pop up:
Now repeat the task three more times and create 3 other watermarks for “Top-Right”, “Bottom-Left” and “Bottom-Right”. At the end, your “Watermarking” drop-down should look something like this:

Here is how I normally do it:
Select all photos to be extracted in Lightroom
Bring up the Lightroom Export window (CTRL+SHIFT+E)
Select the “Bottom-Right” watermark (works best for most images)
Click “Export”
Once images are extracted, go through each one and identify the ones where logo does not look good or is invisible
Select the images that need to have a different watermark placement, then bring up the export window once again and pick a watermark for a different location
Click “Export” again and then overwrite the existing photo
You might need to repeat the steps 5-7 multiple times until you get the watermarks placed well. That’s all there is to it. Now let’s talk about graphic watermarks with logos.
4) Creating a graphic/logo watermark in Lightroom 3
Now let’s move on to the cool stuff, which is adding a graphic watermark with your logo to your images in Lightroom. No matter how good you make the text watermark look, it will never match a good-looking graphic logo. But to accomplish this, you will need your company logo in a transparent format like PNG or GIF. Your logo cannot be in JPEG format, since JPEG has no support for transparency. If you had your logo developed professionally, you should have the original logo in vector/EPS format. You might also find a transparent PNG/GIF file in the same folder. If you cannot locate one, it is very easy to export your logo in a PNG format, as long as you have the source file. A transparent logo should look like this when opened in Photoshop:

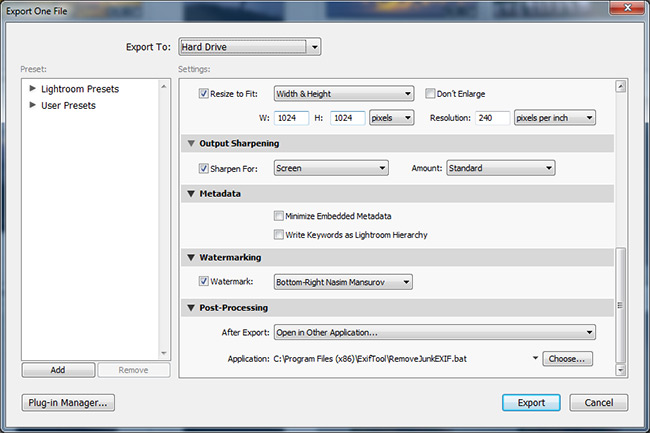
Let’s now pick some photos and bring up the Export dialog box in Lightroom by pressing CTRL+SHIFT+E:


Now open up the Watermark Editor again, change the Anchor to bottom-left, click Save again and give it a name like “Bottom-Left Mansurovs Logo”. Do the same for top-left and top-right. Once you are done, you should have four watermarks for different watermark locations.
Now try to export a couple of photos and see how you like the result. If any watermark is not visible, follow my steps shown above:
Select all photos to be extracted in Lightroom
Bring up the Lightroom Export window (CTRL+SHIFT+E)
Select the “Bottom-Right” graph watermark (works best for most images)
Click “Export”
Once images are extracted, go through each one and identify the ones where logo does not look good or is invisible
Select the images that need to have a different watermark placement, then bring up the export window once again and pick a watermark for a different location
Click “Export” again and then overwrite the existing photo
Here is how my image looks like with our “Mansurovs” logo watermark:
