
.gif)


.jpg)
How to Remove Moiré in Photoshop
In this article, I will show you how you can reduce the effect of moiré in Adobe Photoshop. With the release of the Nikon D800E, which has a different low-pass filter compared to the regular version of the D800 (see Nikon D800 vs D800E), it seems like Nikon opened up a can of worms as it relates to a phenomenon known as “moiré“. For the first time, Nikon is letting photographers pick between two versions of the same camera: one that yields sharper images at a cost of potentially having moiré in images (D800E) and one that yields slightly softer images but has no issues with moiré (D800). This quickly created tremendous interest from photographers, many of whom never even heard of the term “moiré” before the Nikon D800E. Questions started pouring in from everywhere and I spent quite a bit of time trying to explain what moiré is all about and how one could avoid or reduce its effect. This seems to be a primary concern for landscape and macro photographers that also enjoy photographing architecture and portraits (where moiré is seen quite often). Below you will find detailed instructions on how to reduce the effect of moiré in Photoshop.
Can Moiré be completely removed in Photoshop?
Unlike Lightroom 4, which has a built-in tool to reduce moire (and in some mild cases even eliminate it), Photoshop has no automated way of reducing or removing moire. Because of this, there are literally dozens of different methods you can use to deal with moire. I have tried a number of them and I found the below method to work best for the worst moire-infested photographs out there. Most other methods use some sort of blurring technique that actually degrades image quality, which is why I prefer this one instead. If you work with the original file (RAW is preferred), you will definitely get better results than if you work with a small JPEG image (as I will be doing below). While it is possible to completely remove moire in Photoshop, the process can be very time consuming and painful. This is the reason why I have been recommending most of our readers to buy the regular version of the Nikon D800 instead of the D800E. The latter is a specialized tool for dedicated landscape and macro photographers that want to get the best out of their equipment. The last thing you want is introduce another step to your workflow in order to clean up moiré, just because you picked up the wrong camera.
Step One: Remove the Rainbow Pattern
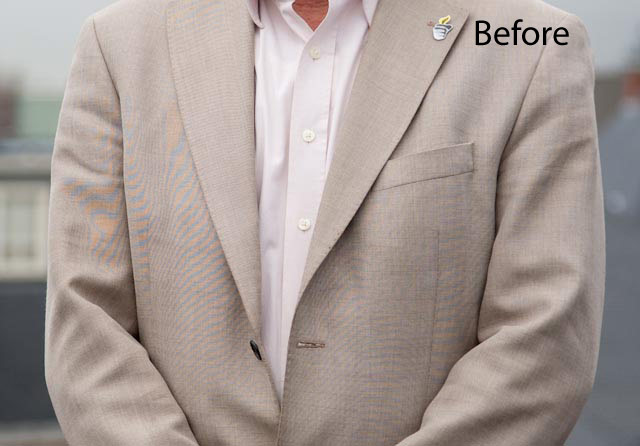
Removing moire in Photoshop is done in two steps – the first one removes the rainbow pattern of moire and the second one takes care of the Luminance channel pattern. Let’s get started with the same jacket image I presented in “what is moiré” article. I decided to use this image, because it has a very strong moiré pattern with yellow and green rainbow discolorations. This type of moiré is pretty much a worst-case scenario:

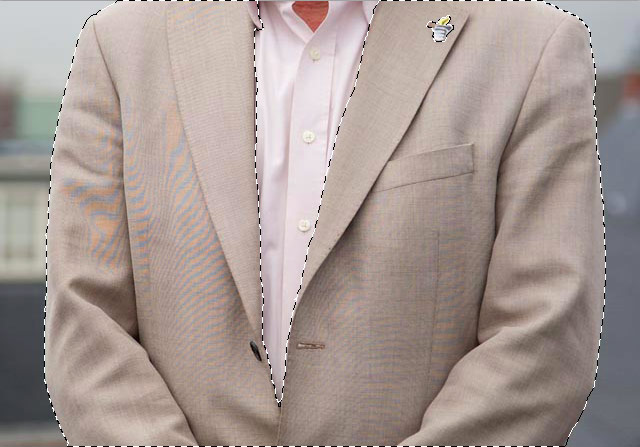
Once you have the photo with moiré open in Photoshop, the first thing we’ll do is make a selection of the entire area that contains moire. You can use different tools to accomplish this. I used Magnetic Lasso Tool, along with the Quick Mask Mode to make the below selection:
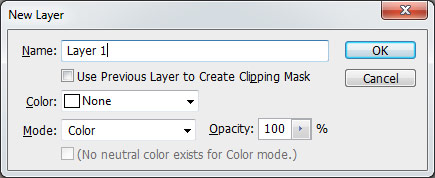
Next, create an empty layer by going to Layer->New->Layer, then select “Color” under “Mode”:

The first step is complete – we have successfully removed the rainbow pattern from the affected area, as can be seen below:

Step Two: Repair the Luminosity Channel
Now that the ugly rainbow pattern has been removed, we can now move on to repairing the luminosity channel – the wavy forms that are left from moire. This part is much more complex than the first one and might need some tweaking to get the best results. In some cases you might not be able to completely fix the luminosity channel, so you might need to introduce other tools (such as the blur tool) to minimize its effect.
First, hide the lastly created layer by clicking the eye right in front of the layer.
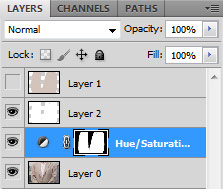
Make sure that the selected area stays selected. Now select the background/first layer (the original image) and create another layer, just like we did in step #3 in Step 1. Go to Layer->New->Layer and again set the “Mode” to “Color. Click OK
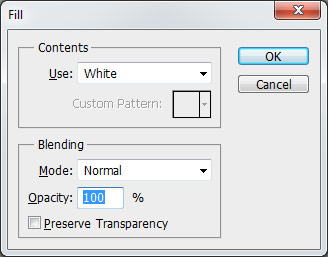
Once again, go to Edit->Fill (Shift+F5), but this time select “White” under Contents->Use:

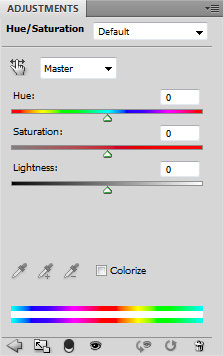
Next, do the same with “Saturation”, by moving the slider slowly from left to right. Again, you will find that the extreme values will make the pattern even more visible. Sometimes moving this slider will accomplish nothing, as in the case of this particular image (I left the “Saturation” level at “0″). By now, most of the pattern problems should have disappeared from the selected area.
The last step is to turn the second layer on by clicking on the eye in front of the layer. This will make the second layer visible and the normal fabric colors should come back.
Go to Layers->Flatten Image to merge all layers and flatten the image.
Here is a before and after: